Sunday, April 21, 2013

Buttermilk Cupcakes and Believing


Hasn't this just been one hellacious week ? The Boston Marathon Bombing; the ricin threat in Washington DC and the horrific explosion in West, Texas.  I couldn't bear to read the online news this morning-sometimes it's just too much.  I cannot even imagine what those involved have been going through.  I can only offer my thoughts and prayers and keep them in my heart.

Last night when J and I were out walking, we passed two little 8 year old boys playing in a front yard.  Just seeing the innocence in their faces pierced my heart and took my breath away.  I don't have children but I thought about the mother inside that house, cleaning up after dinner, doing all those little things that we take for granted.  I tried to imagine myself with those two little boys and it hurt to think about how quickly life can change.  How in an instant that sweet little scene of the two boys playing could turn into an unfathomable emptiness. My heart goes out to everyone whose life has been changed drastically by the events of this week. Even more importantly this week has been another reminder of how important it is not to take anything for granted-reach out and tell someone every chance you can how much you love them or value them. And believe that as corny as it may sound good will always triumph over evil. And the number of good people far outnumber the bad.  Go out and share your goodness and enjoy your life to the fullest.


I started the baking process for these cupcakes before the bad guy was captured by the amazing law enforcement community of Boston.  My heart wasn't in them when I started and now I am so grateful for how it ended. Peace and love to you all.

Buttermilk Cupcakes: 
Nigella Lawson's 'Heavenly Buttermilk  Cake' from Paris Loves Pastry
With the sweet little containers I used, I got 14 cupcakes from this recipe


Ingredients: 1 ⅔ cups all-purpose-flour 1 ½ teaspoons baking powder ½ teaspoon baking soda ¼ teaspoon salt ¾ cups + 2 tablespoons buttermilk (or you can use ⅓ cup plain yogurt mixed with ½ cup low-fat milk) 1 ½ teaspoons vanilla extract ½ cups soft unsalted butter ¾ cup sugar 3 large eggs room temperature

Instructions:
- Preheat the oven to 350˚F
- Sift flour, baking powder and salt together into a bowl and set aside. Pour the buttermilk into a measuring cup and stir in the vanilla. Cream the butter and sugar in a large bowl with an electric mixer at medium speed until it's light and fluffy. Reduce the speed  to low and add the eggs one at a time, beating for 30 seconds between additions. At this point the batter will look like it's breaking but don't worry -the flour will bring it together.  Add alternating increments of the flour mixture and the vanilla-buttermilk, blending well after each addition, ensuring that you finish with the addition of flour; this should take 3 to 5 minutes.
- Fill the cupcake liners ¾ full and bake for 15 to 20 minutes or until a cake tester comes out clean.


Chocolate Buttermilk Frosting

(Makes about 4-5 cups)
4 ounces unsweetened chocolate, melted and cooled slightly
2 sticks butter, at room temperature
5 cups (20 ounces) powdered sugar
1/4 cup (3/4 ounce) cocoa powder
1 teaspoon vanilla
1/3 cup buttermilk


In a large bowl, cream together the melted chocolate and butter until smooth and creamy. Add the powdered sugar, cocoa powder, and vanilla, and begin mixing. Slowly add in the buttermilk until the frosting reaches your desired spreading consistency. If the frosting is too stiff, add a few more drops of buttermilk.


PS I saw these sweet little cupcake holders over on Sonia's blog,click HERE.  She has a PayPal account and shipped them from Malaysia so the postage is actually more than the cost of the containers.  I searched the Internet for them but she is the only one I could find who was selling them. Check out her store on her website-very reliable and quick response and shipping.

Sunday, March 31, 2013

Lemon Ricotta Doughnuts


I cheated here, I added a dollop of leftover filling to the doughnut !

I wasn't paying attention the other day when I placed my order with Amazon Fresh and ended up ordering twice the amount of Ricotta I needed. So here I am with extra Ricotta , what should I do with it?  Off to Google Land I go. After searching and searching this recipe caught my eye : Baked Lemon Ricotta Doughnuts. Hmm,baked doughnuts-well that's healthier than fried, right ? Filled with a Lemon Ricotta filling-yum that will use up my leftover Ricotta.  Dusted in lemon sugar-okay I'm sold.

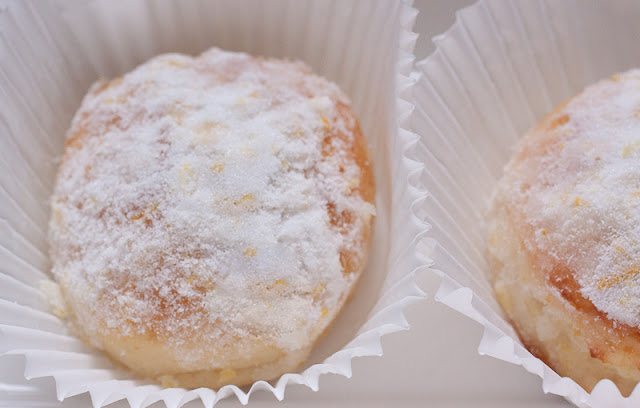
This is what they really look like out of the oven, the filling permeates the center of the doughnut, so you have a moist ricotta center.

Next time I make these I will do a few things differently.  #1 Freeze the little scoops of ricotta filling-being a soft cheese the ricotta melted into the doughnut,still delicious, but I prefer to find a nicely filled center when I bite into a doughnut.  I think if the ricotta filling is frozen to a truffle type consistency-not rock hard-it would soften nicely while baking. #2, I would not mix the lemon zest with the sugar until I dried out the lemon zest a bit.  The moisture in the lemon zest makes the sugar clump. Either that or wait until the very last minute to mix up the zest and sugar.  And #3, I would probably try a nice lemon glaze instead of the sugar and sprinkle the zest over it while the glaze was still wet.


The doughnuts are delicious straight out of the oven, but then again what isn't ?  The next day they were a little dry but a quick 30 seconds in the microwave solved that problem.  This is a really good recipe and I love the dough-seems like you could make some really good savory doughnuts with it. It bakes up  like a fluffy biscuit. Maybe I'll try some feta filling with spinach and work some sun dried tomatoes into the dough.  Oh the possibilities are endless.

After coffee and a doughnut I'm off for a long, long walk.  Maybe if I add another mile to my walk I can justify a doughnut for dessert tonight.  Remember  I'm the  Queen of Rationalization !   Bon Appetit.


Baked Lemon Ricotta Doughnuts

5 cups all purpose flour, plus extra for dusting
½ cup plus 3 Tablespoons super fine sugar (Baker’s Sugar in grocery stores)
1 package of yeast
Zest  of 2 lemons
1 cup lukewarm whole milk plus  extra for brushing
1/3 cup buttermilk at room temperature
2 eggs at room temperature
2 Tablespoons (1 ounce) butter, melted

Lemon Ricotta Filling
8 ounces Ricotta
1/4 cup sugar
Zest and juice of 1 lemon
1 large egg

Finishing
8 Tablespoons unsalted butter
1 cup super fine sugar
Finely grated zest of  2 lemons

Prepare one large or two medium sized baking sheets with parchment paper or Silpats.
Combine flour, sugar, yeast and lemon zest in the bowl of an electric mixer-use a whisk to combine. Once combined fit the mixer with a dough hook. In a separate bowl whisk together warm milk, room temperature buttermilk and eggs and the melted butter. With the mixer running on slow, add the liquids to the flour mixture, then mix on medium speed until dough is smooth and elastic (about 4-5 minutes). Shape the dough  into a ball, place in a lightly oiled bowl, cover with plastic wrap and let stand in a warm place until doubled in size (1 – 1 1/2 hours).

Lemon Ricotta Filling
Whisk together ricotta, sugar, lemon zest, lemon juice and egg just until smooth. Transfer the mixture to an airtight container and chill for at least 1 hour.
The Dough
Gently punch down the dough and turn onto a lightly floured surface. Roll the dough out to ¼ inch thickness or just slightly under (5mm thickness). Cut out 24 rounds using a 3” cutter. Cut out another 24 rounds using a 2” cutter. Place a heaping teaspoon of lemon ricotta filling in center of 24  2” rounds. Brush edges of the 2” rounds with milk, cover with the remaining rounds 3” rounds and press firmly to seal the edges. Trim with the 2” cutter. Transfer to baking sheet(s), cover and let stand in a warm place for 1 – 1 1/2 hours.

Preheat oven to 375 degrees. Bake the doughnuts for 10-12 minutes until the bottoms are golden-the tops will bake up with just a blush of brown.

For the finishing garnish, melt the 4 ounces of butter and set aside. For the lemon sugar, place the sugar and lemon zest in a bowl of a food processor and pulse until the sugar is aromatic. Pour into a bowl and fluff with a fork or a whisk.

Once you remove the doughnuts from the oven dip the hot doughnuts immediately in the melted butter and then toss in lemon sugar. Serve warm.


Friday, March 15, 2013

Abracadabra Magic Custard Cake


Have you seen this cake on Pinterest yet ?  I don't know how you could miss it-everyone has been pinning it for days.  When I first spotted it I immediately went to the blog :White on Rice Couple, since they had just posted it.  I love everything that Diane and Todd do on their blog.  I probably have more of their recipes bookmarked and saved than anyone else's on the web.  And their pictures of this cake are absolutely gorgeous.  So of course I had to try it out.  The recipe is fairly simple. And after coming off my marathon Cubano Croissant recipe I needed something simple and sweet.  If you don't like custard I wouldn't recommend this cake-it is after all a custard cake !   I took Diane & Todd's advice to beat the egg whites in a copper bowl, but if you don't have a copper mixing bowl just add the vinegar to the egg whites as called for in the recipe.


This cake goes into the oven in an 8 x 8 pan almost filled to capacity-I thought it was a little too thin of a cake batter,but oh boy was I wrong.  When it was finished baking it had souffled higher than the pan edges.  By the time I got my camera the cake had sank a little.  I checked Diane & Todd's pictures and I wasn't worried.  This cake looks so unassuming coming out of the oven-don't let that fool you.


The smell of the vanilla custard was hard to resist and before it had a chance to properly cool, I was cutting a little tiny piece out of the corner to test it. Holy Custard Cake Batman-this is indescribably delicious.  Addictive, not too sweet with the puffy top cake layer, the creamy firm custard layer and a very thin bottom cake layer. Swoon.  When you make this,here is a winning bet for you; bet the other person that they just can't eat one piece-you will win-trust me.  I had to quickly wrap up little packages of this deliciousness for my neighbors.  Otherwise it would have been about 3 hours on the treadmill for me.


This recipe is definitely a keeper. I can't wait to try it out when we are camping and see how it bakes up in Ruby our camper van.  I know one thing, sharing this around the campground will result in friends for life.

Yummy custard


  Go ahead, try it, so very good with a hot cup of espresso. Head over to Diane & Todd's blog for the recipe : White on Rice Couple.   Bon Appetit !

A party without cake is really just a meeting"-Julia Child

Wednesday, March 6, 2013

Cubano Croissants ala Christina Tosi


I was casually reading the HuffPost Taste section Friday morning when the title "Christina Tosi's Cubano Croissant" caught my eye.  I am absolutely crazy about Cubano sandwiches and when I saw the chance of making it as a croissant-well my little heart skipped a beat !  Add to the fact that it was a recipe from Christina Tosi,  the 2012 James Beard Rising Star Chef- it couldn't get any better. Christina is the founding chef of Momofuku Milk Bar and if you haven't made her crazy delicious Crack Pie  yet, you should.


Warning-this is a very time consuming but "simple" recipe. Simple meaning basic cooking and baking methods-nothing fancy required. Time consuming yes - 15-20 minutes to make the dry rub; 6-12 hours to roast the pork shoulder; 20-30 minutes to make the mojo marinade; 30 minutes to make the relish butter;a minimum of 3 hours to make the croissant dough;and about 1 hour to fill and bake the croissants !  Would I do it again ?  Not next week, but yes I will make these again-they are freaking incredible.  You can't believe the taste.  A buttery,flaky croissant dotted with dill relish,a schmear of yellow mustard, then filled with ham,Swiss cheese and the mojo marinated pulled pork. We ate these for dinner Monday night and all we could do while eating was make those mm mm sounds between bites.  I lost count of how many times J said this was the best sandwich he ever had.  I second that !


I started this recipe on Saturday-cooked the pork for about 9 hours.  On Sunday I made the relish butter and on Monday morning I made the croissant dough.  By Monday afternoon I was ready to roll these little beauties and pop them in the oven.  The recipe stated that they should be baked for 2-25 minutes at 375degrees.  My oven has been calibrated so I know it's accurate-my baking time was more like 45 minutes until they got that beautiful caramelized brown color. (I've listed a few other changes I made to the recipe below).  I could barely wait for them to cool down before that first test bite.  OMG , that is all I can say.  The recipe appears at the end of the You Tube Video.  Christina Tosi uses her "mother dough recipe" for the croissants and if you have her Milk Bar Cookbook you can find the recipe there.  Otherwise,use your favorite croissant recipe.  My policy is not to list a recipe unless it's on the Internet already and the Mother Dough isn't. You might be able to find it here.  Buy the book,it's filled with wonderful scrumptious recipes !


I made a few changes to the recipe:
  1.  I used dill relish in the relish butter and a combination 1/2 dill relish and 1/2 of sweet relish in the marinade.
  2. I added Swiss cheese to my layers when putting the croissant together-one below the pork filling and one on top of the pork filling-I've always had my Cubano's with cheese.
  3. And the next time I will use my slow cooker to make the pork-the oven dried it out too much-I should have trusted my instincts.  When I put it in the oven a little voice said use the slow cooker but I ignored it. 
  4. I chopped the pork mixture into smaller pieces-made it more manageable to form into the little mounds before rolling the croissants.
  5. I quadrupled the ingredients for the marinade-the amount the original recipe called for barely gave a tiny hint of taste to the 6 lb pork shoulder I made.
  6. I used a full recipe for the "mother dough"-that gave me enough dough for 12 nice sized croissants and I still had lots of pork left over (very good as Cubano sliders on those Hawaiian buns !)
Happiness does not come from doing easy work
but from the afterglow of satisfaction
that comes after the achievement of a difficult task
that demanded our best.
-Theodore Isaac Rubin


Honestly, I will definitely make these again- and there was a huge amount of satisfaction when I completed these !


Wednesday, February 27, 2013

Blueberry Cream Biscuits with Blueberry Sauce


Last week I was sitting in my dentist's office waiting for my name to be called.  I hate the dentist. It took me forever to get up the nerve  to make my appointment.  I take care of myself so I thought I was going to skate by. Unfortunately that was not the plan my teeth had for me. Two crowns-one upper and one lower-did I tell you I hate the dentist ?  My dentist is a very sweet and a nice guy-I don't hate him-just the process.  So while I was waiting, with high anxiety, I tried to distract myself with the usual waiting room reading material. I started flipping through the pages of Better Homes and Gardens, whoa..what is that-blueberries ?  I wanted to run home and try the recipe immediately.  Of course it had nothing to do with the fact that I was looking for any reason to run out of the dentist's office.  Too bad, they called my name, and for the next  2 hours I endured the drilling and water squirts down my throat.  I'm not afraid of drills, I just don't like having tools and hands in my mouth.  I start to get very anxious and have to remind myself to breath.  I don't do laughing gas, it just makes me more anxious and doesn't make me laugh !  So I sat there thinking about these biscuits in order to distract myself. The recipe seemed far too simple.


Two hours later and finally out of the dentist's chair I was finished.  Thanking my dentist and his assistant for the torture they inflicted on me-why ?  I mean really, thank you for making me sit with my mouth opened for 2 hours while you drilled and scraped and suctioned out my mouth ? Needless to say I just about ran out of the office.  On the way home I did manage, (in spite of the swollen tongue and mouth), to stop for fresh blueberries and whipping cream .  As soon as I got home I suddenly felt very tired.  Stress will do that and dental work is at the top of my stressors.  So instead of baking I took a nap.  These could wait one more day.


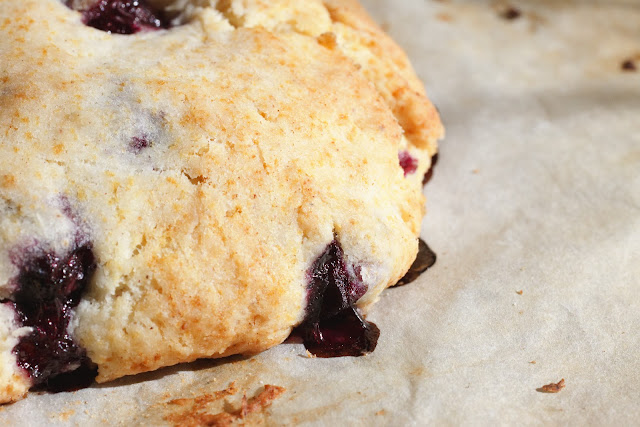
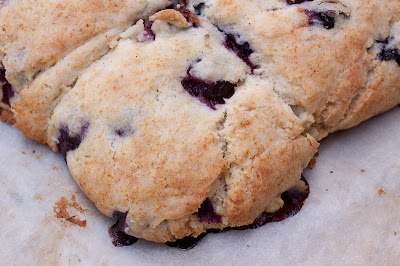
The next morning I looked over the recipe and about 45 minutes later I was pulling these babies from the oven.  This really  is  a super simple recipe and oh so good.  Another one to add to my "go to recipes ".  Even the blueberry sauce was easy peasy !  You should make these.  Run out to the grocery store right now and get your blueberries and any other ingredients you might need.  And if you go to the Better Homes and Gardens site and read the review saying that these were horrible,too sticky, only the tops baked, etc. etc., ignore it.  It couldn't be further from the truth.


Now please don't let my dentist know that 48 hours after he finished I was eating teeth staining blueberry biscuits with blueberry sauce.  Just kidding ! No stains , nothing but sweet deliciousness-enjoy !


Blueberry Cream Biscuits with Blueberry Sauce
Yield: 12 biscuits

Ingredients:
2 cups all-purpose flour
2 teaspoons baking powder
2 tablespoons sugar
1/2 teaspoon salt
1/4 teaspoon grated nutmeg
1 cup blueberries
1 1/2 cups whipping cream

Preheat oven to 425 degrees F.  In a large bowl thoroughly mix flour, baking powder, sugar, salt, and nutmeg. Toss blueberries with the flour mixture. Stir whipping cream into the flour mixture until just moistened.
Turn out dough on a floured work surface.( In order to not overwork or over flour the dough , I turned it out onto my parchment lined baking sheet. Didn't have to worry about it sticking, just gently formed it into the 7 inch square. And I used the edges of the parchment paper to help gently lift and fold the dough)  Gently lift and fold dough four or five, making a quarter turn between each fold. Place dough on a parchment-lined baking sheet. Form dough in a 7- to 8-inch square, approximately 1 inch thick. Using a floured pizza cutter or knife, cut 12 to 16 squares in dough, leaving biscuits intact. Bake in upper half of oven for 17 to 20 minutes or until golden brown. Cut through or pull apart biscuits. Serve warm with Blueberry Sauce.


Blueberry Sauce:
    2 cups blueberries
    1/3 cup sugar
    2 tablespoons water
    1 teaspoon vanilla 

In a medium saucepan combine 1 cup of the blueberries, the sugar, and water. Bring to simmering; cook and stir until blueberries pop and sauce has thickened. Remove from heat, then stir in the vanilla and remaining blueberries. Serve warm or at room temperature.


Saturday, February 23, 2013

Creme Brulee Eclairs Set on Fire


I was in the grocery line on Valentines Day doing some last minute shopping for our camping trip .  We would be celebrating Valentines Day over the long President's Day weekend.  The grocery clerk was making small talk and asked what plans I had.  Of course I was bubbling over with enthusiasm about the upcoming trip and told her we were going to a new campground on the Washington Coast that we had never been to before.  When I told her the name -Cape Disappointment-her mouth dropped and she said: "Oh" with a sad frown face. Then she added that it didn't sound like a very good place to be celebrating.  Isn't it funny how we allow people to interfere with our happiness ?  As I walked out of the store I realized I had allowed her to steal my joy. By the time I got the groceries loaded into the car I realized how silly I was.  Shame,shame,shame on me for allowing her to be a black cloud over my happiness.

Cape Disappointment ? No! More like "Cape could never be disappointed" because it's so beautiful .

 Cape Disappointment or Cape Happiness,the name didn't matter-it's what you make of it and we always try to make the very best of it.  So smile back on my face,to do list in hand and groceries packed in Ruby.  Now to decide what special dessert to make for our camping celebration.  I had to think about what would keep well and still look pretty and very special when it came time to eat. Cupcakes?  Mmm,a little too mundane for this trip. Cake? Too much for just the two of us. Pie? Nahh,wasn't in the mood for rolling dough.  Doughnuts? Doughnuts are always a good idea but best eaten fresh out of the frying pan and I wasn't plan on heating up a pan of oil inside Ruby our camper. Eclairs ?  Yes I know the last post I did was on eclairs-but they are so lovely and so special.  And they keep very well.  Now what could I do to make them even more special.  I started thinking about flavor combinations and after looking at a zillion eclair images on Google I thought -Creme Brulee ?  Why not,it's a pastry cream filling and I could torch the sugar at the campsite with little or no effort. And what a fabulous surprise it would be-sitting on the beach eating Creme Brulee eclairs to celebrate our good fortune and our being together !


These Creme Brulee Eclairs were definitely a challenge.  I knew the creme brulee pastry creme would be less firm than regular pastry creme .  I decided that I would slice the eclairs in half and fill them that way, rather than trying to fill them with a pastry bag .  My reasoning was that I was fearful that the torch to brulee the tops would melt the filling.  I should have been more fearful about burning the tops of the eclairs !  Since I had a rounded surface to work with, the sugar kept falling off . And the nooks and crannies associated with eclairs started to burn around the edges. I set quite a few on fire ! Trust me,burnt sugar and burnt pastry are not very tasty.

I decided I wasn't going to have a four alarm fire going inside Ruby down at the coast so I opted to finish these off at home.  And I opted to give up the torch and use my copper caramel making pot !  I burned a few finger tips while dipping the tops but we all have to make sacrifices-and well worth the pain for the taste. The creme brulee filling was creamy and tops were caramel crunchy.  Just like a spoonful of creme brulee with the added taste of crispy pastry.


I used my new go to recipe for eclairs from Tom Douglas's book: The Dahlia Bakery Cookbook.  His recipe produces perfect eclairs every single time ! And I used Joe Pastry's recipe for the creme brulee.  For the hard crack caramel topping I cooked 2 cups of sugar with 1/2 cup water over medium high heat until it turned a nice amber color-about 15 minutes.  Once you take the caramel away from the heat you have to work quickly because it's still cooking in your pot-be careful , it's extremely hot !  I dipped each top into the caramel very carefully.  After the caramel hardened I filled the other half of the eclair with the creme brulee filling and placed the two halves together-Voila !


Oh, I almost forgot to share with you the good fortune that came my way this week !  The HuffPost Taste Section used my photo of my Kouign Amann posting  from April 2011.  When I got the email from them I thought it was a scam or virus and almost didn't open it . So glad I did-that news was like the icing on the cake after our wonderful weekend ! Thank you Huffington Post !